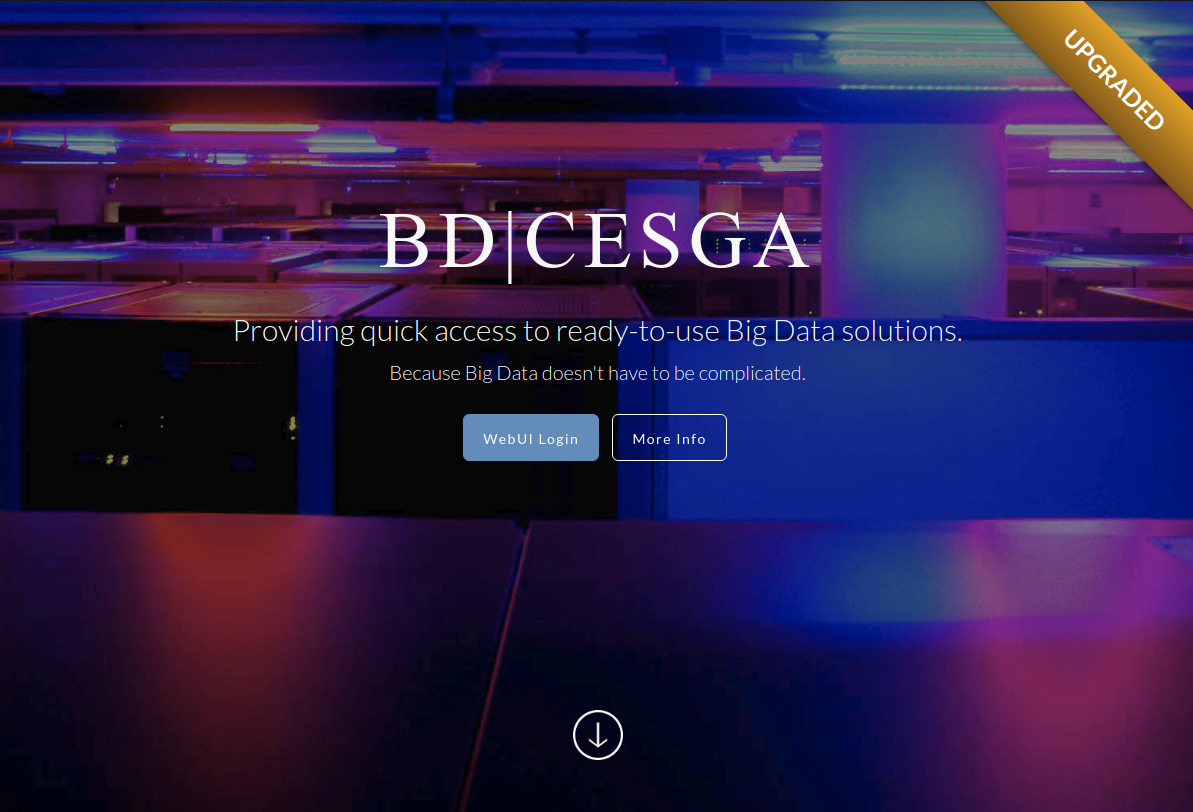
BD|CESGA
Providing quick access to ready-to-use Big Data solutions
Because Big Data doesn't have to be complicated
Javier Cacheiro / Cloudera Certified Developer for Spark & Hadoop / @javicacheiro
Big Data
Introduction
3Vs of Big Data
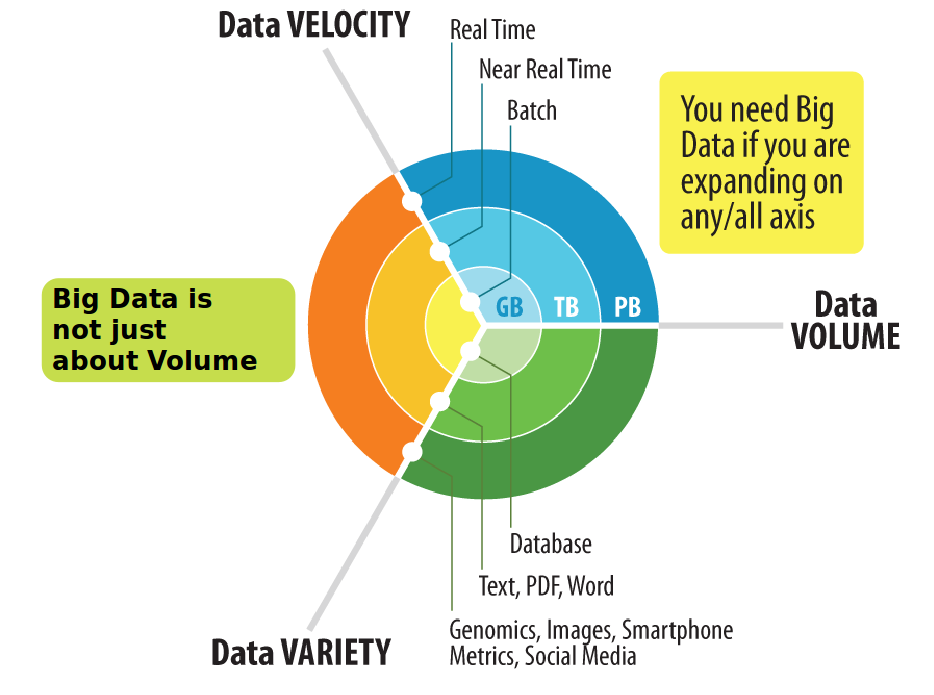
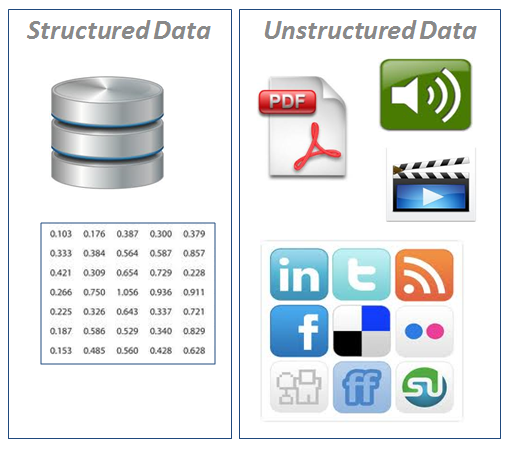
Variety

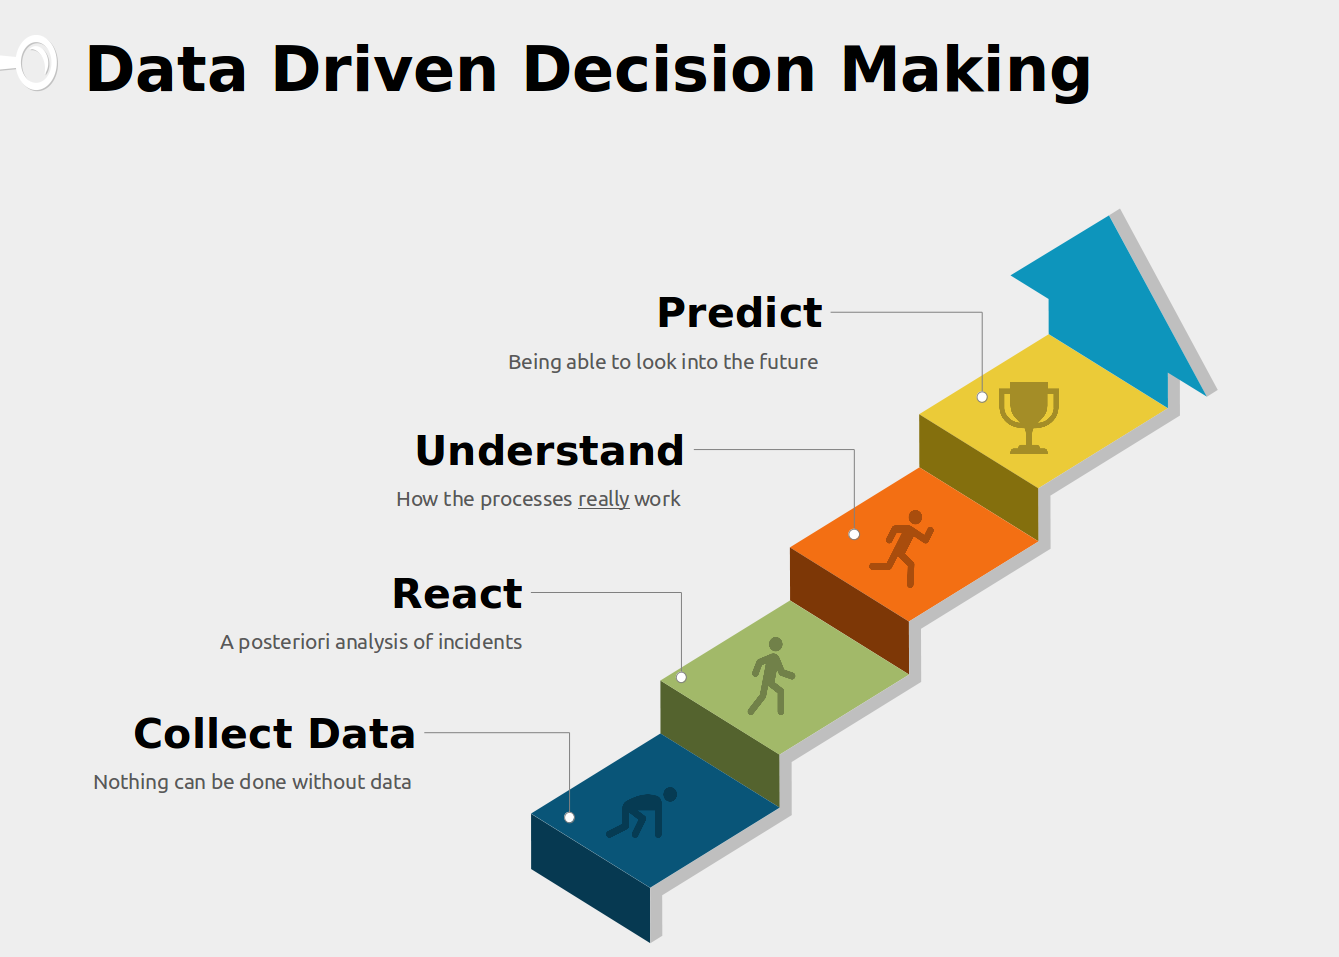
The importance of data

We don’t have better algorithms.
We just have more data.

Big Data
Important concepts
Vertical Scaling

Horizontal Scaling

Data Centric
Compute centric: bring the data to the computation
Data centric: bring the computation to the data
MPI Shortcomings
Jonathan Dursi: HPC is dying, and MPI is killing it
- Wrong level of abstraction for application writers
- No fault-tolerance
BD|CESGA
Hardware
Hardware Infrastructure
- 38 nodes: 4 masters + 34 slaves
- Storage capacity 816TB
- Aggregated I/O throughtput 30GB/s
- 64GB RAM per node
- 10GbE connectivity between all nodes
Hardware Master Nodes
- Model: Lenovo System x3550 M5
- CPU: 2x Intel Xeon E5-2620 v3 @ 2.40GHz
- Cores: 12 (2x6)
- HyperThreading: On (24 threads)
- Total memory: 64GB
- Network: 1x10Gbps + 2x1Gbps
- Disks: 8x 480GB SSD SATA 2.5" MLC G3HS
- Controller: ServeRAID M5210 1GB Cache FastPath
Hardware Slave Nodes
- Modelo: Lenovo System x3650 M5
- CPU: 2x Intel Xeon E5-2620 v3 @ 2.40GHz
- Cores: 12 (2x6)
- HyperThreading: On (24 threads)
- Total memory: 64GB
- Network: 1x10Gbps + 2x1Gbps
- Disks: 12x 2TB NL SATA 6Gbps 3.5" G2HS
- Controller: N2215 SAS/SATA HBA
BD|CESGA
Software
Platforms available
- Hadoop Platform
- PaaS Platform (beta)
Hadoop Platform
- Ready to use Hadoop ecosystem
- Covers most of the uses cases
- Production ready
- Fully optimized for Big Data applications
PaaS Platform
- When you need something outside the Hadoop ecosystem
- Enables you to deploy custom Big Data clusters
- Advanced resource planning based on Mesos
- No virtualization overheads: based on Docker
- Includes a catalog of products ready to use: eg. Cassandra, MongoDB, PostgreSQL
BD|CESGA Portal
bigdata.cesga.es
Front Page
General info
Tools available

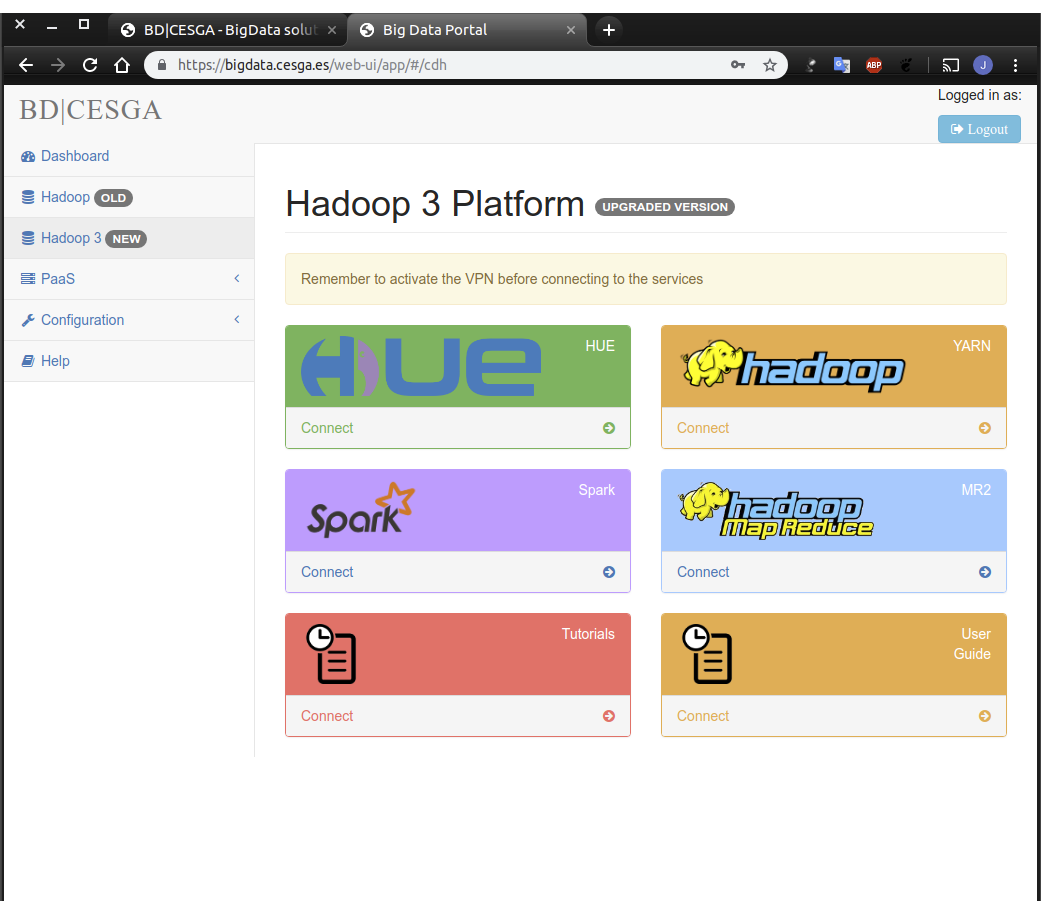
WebUI
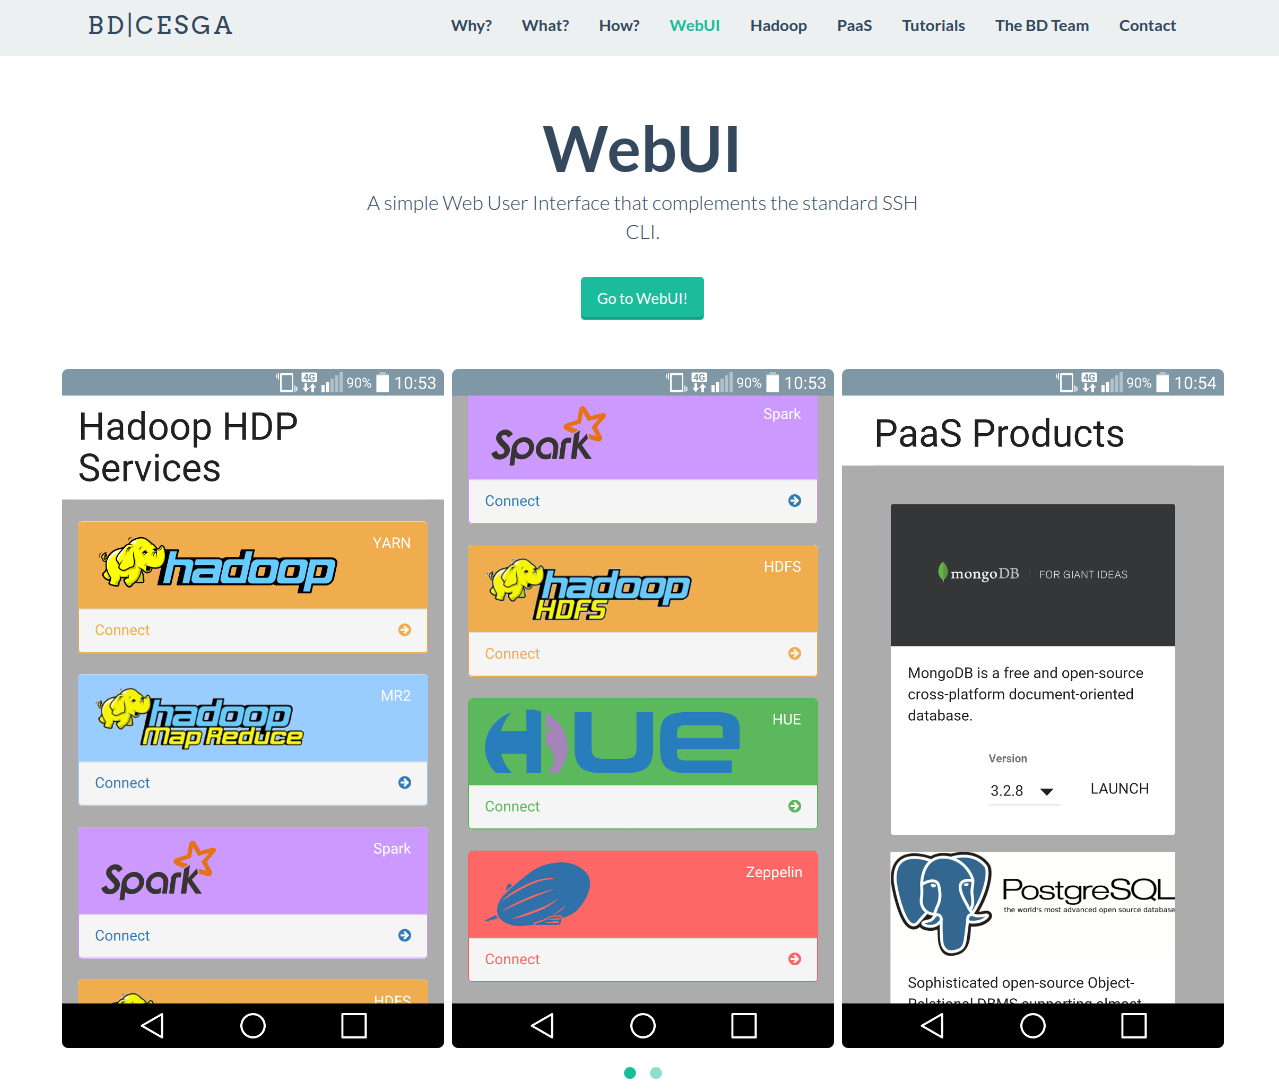
Tutorials
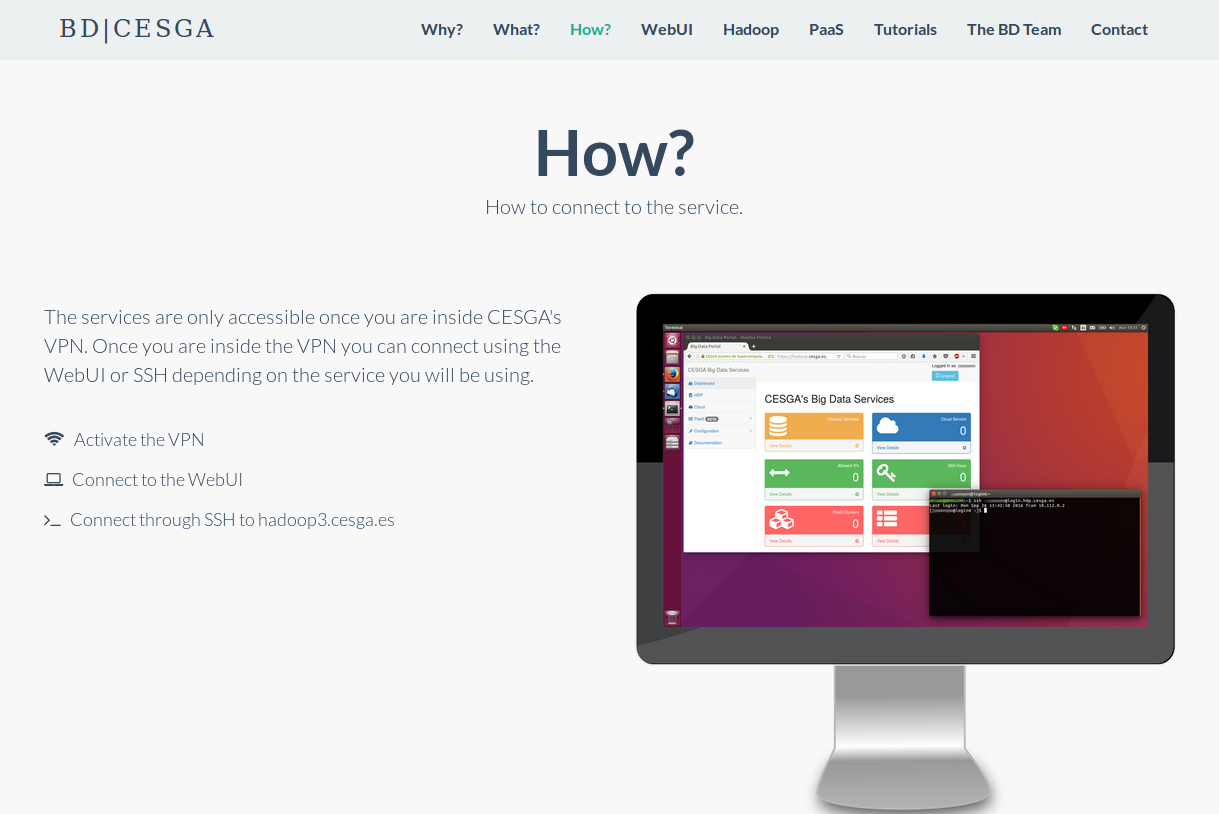
Accessing Hadoop 3 Service
VPN
VPN
The VPN software allows you not only to connect to CESGA in a secure way but also to access internal resources that you can not reach otherwise.
Installing the Forticlient VPN software
- Download the VPN software from Official Forticlient download page or from the CESGA Repository
- For Windows/Mac just launch the installation wizard
- For new Linux version follow the official instructions
- For old Linux versions see the next slides
- There is also an alternative open-source Linux client: OpenFortiVPN
Forticlient Configuration
- Enter the following configuration options
Gateway: gateway.cesga.es
Port: 443
Username: your email address registered at CESGA
Password: your password in the supercomputers
VPN Installation in old Linux versions
- If your Linux distribution is not supported in the official download page use our CESGA Local Repository
- Follow the next steps:
unrar e vpn-fortissl.rar
tar xvzf forticlientsslvpn_linux_4.4.2323.tar.gz
cd forticlientsslvpn
./fortisslvpn.sh
Accept the license agreement presented
../forticlientsslvpn_cli \
   --server gateway.cesga.es:443 \
   --vpnuser usuario@dominio.com
Alternative Open Source Linux Client OpenFortiVPN
- For Linux there is also an alternative open-source client that you can use instead of the official fortivpn client
- Some Linux distibutions like Ubuntu, Debian, OpenSuse or Arch Linux provide openfortivpn packages
- Check the project github page for details openfortivpn
- It has also a GUI that you can use: openfortigui
For more info check the VPN section of the User Guide
How to connect
How to connect: Setup
- Configure the Fortigate VPN
- Start the VPN
How to connect: SSH
Using a powerful CLI through SSH:
ssh username@hadoop3.cesga.esHow to connect: WebUI
Using a simple Web User Interface
How to connect: Remote Desktop
No VPN needed if connecting from a Remote Desktop
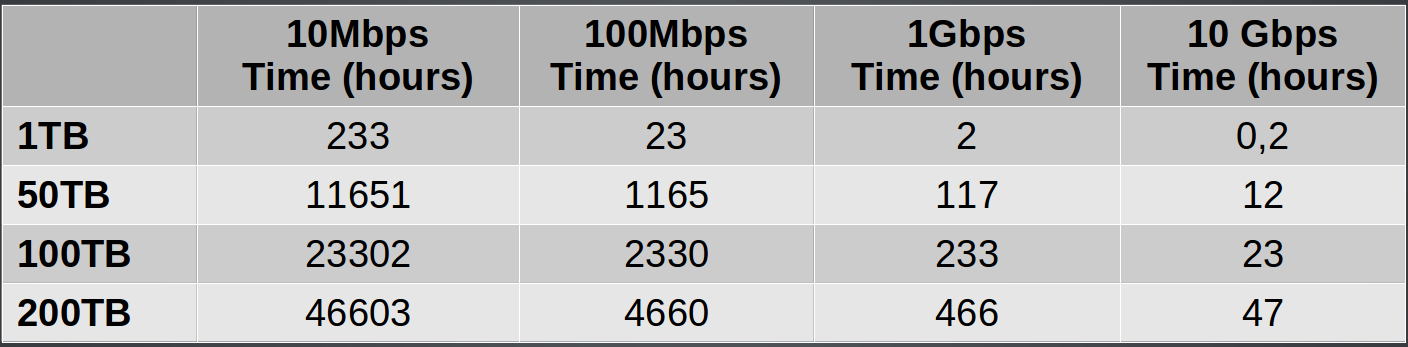
How to transfer data
How to transfer data efficiently
Use our dedicated Data Transfer Node: dtn.srv.cesga.es
SCP/SFTP is fine for small transfers
But for large transfers use Globus
Our endpoint is cesga#dtn
For more info check the DTN User Guide
Expected upload times
How to transfer data: non-efficient way
Direct SCP/SFTP to hadoop3.cesga.es
Useful only for internal transfers: eg. FT to BD
Not recommended for external transfers because it will be slowed down by the VPN server and the firewall
Filesystem Quotas
- HOMEBD and HDFS have quotas
- To check current usage you can use the command:
myquotaDefault Filesystem Quotas
Defaults:
- HDFS: 18TB
- HOMEBD: 800GB
If you need additional space you can request Additional Storage
Backup policies
HDFS and HOMEBD do not have automatic backups configured
Only HOME FT has automatic daily backups
If you need to backup data in HDFS or HOMEBD contact us
Migrating Data from Hadoop 2
We recommend that you use the discp tool
hadoop distcp -i -pat -update hdfs://10.121.13.19:8020/user/uscfajlc/wcresult hdfs://nameservice1/user/uscfajlc/wcresultRun it from hadoop3.cesga.es so it takes into account HA
Hadoop
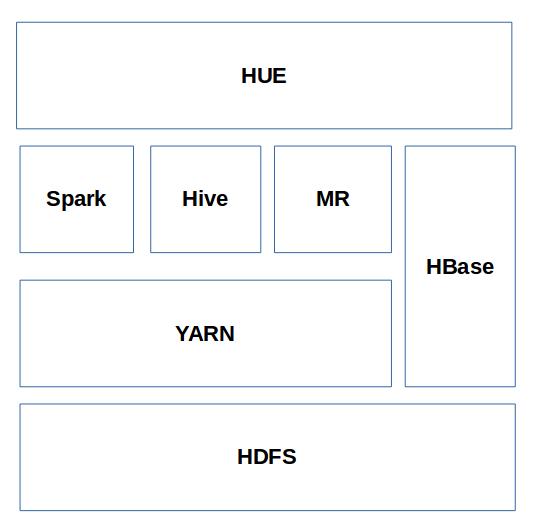
Core Concepts
Core Components
- HDFS: Parallel filesystem
- YARN: Resource manager
Ecosystem
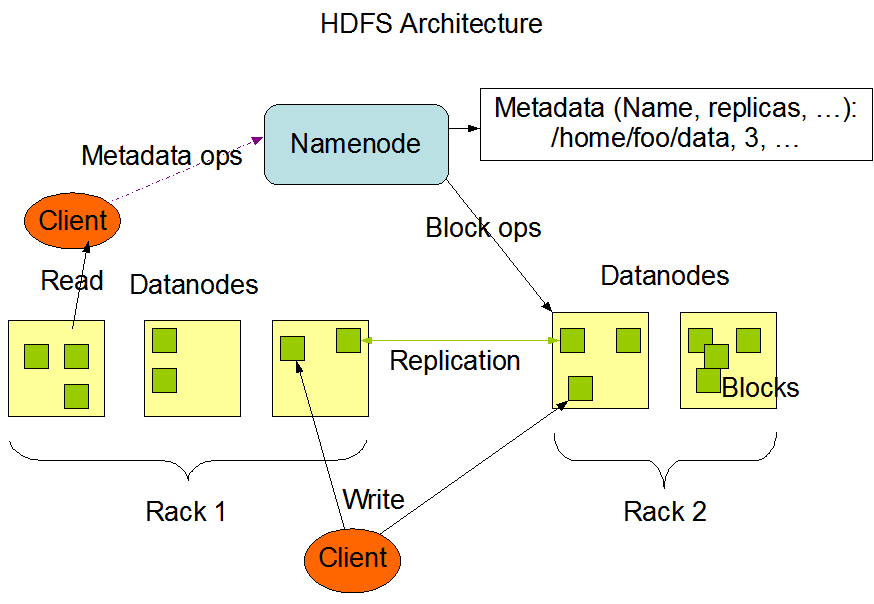
HDFS
The Hadoop Distributed Filesystem
HDFS Architecture
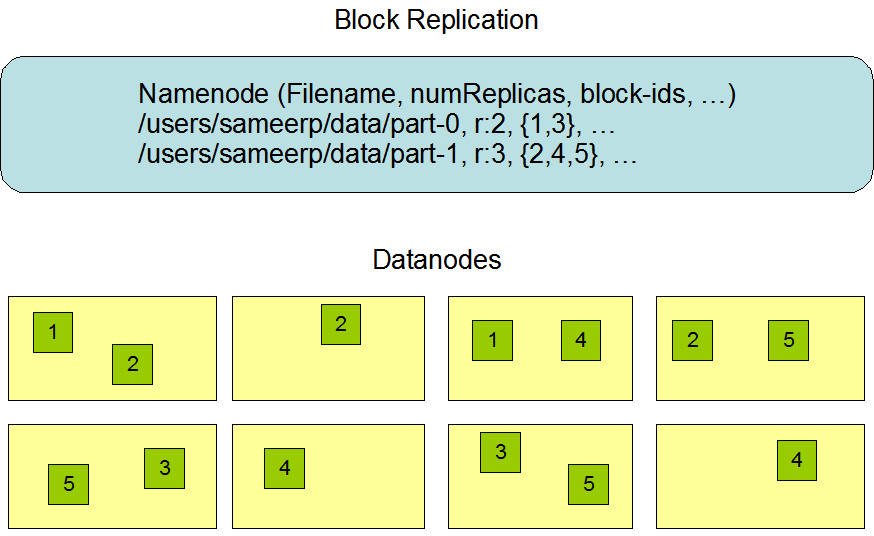
HDFS Replicas
Upload a file to HDFS
To upload a file from local disk to HDFS:
hdfs dfs -put file.txt file.txtIt will copy the file to /user/username/file.txt in HDFS.
List files
To list files in HDFS:
hdfs dfs -lsLists the files in our HOME directory of HDFS /user/username/
To list files in the root directory:
hdfs dfs -ls /Working with directories
Create a directory:
hdfs dfs -mkdir /tmp/testDelete a directory:
hdfs dfs -rm -r -f /tmp/testWorking with files
Read a file:
hdfs dfs -cat file.txtDownload a file from HDFS to local disk:
hdfs dfs -get fichero.txtWeb File Explorer
You can easily access the HUE File Explorer from the WebUI:

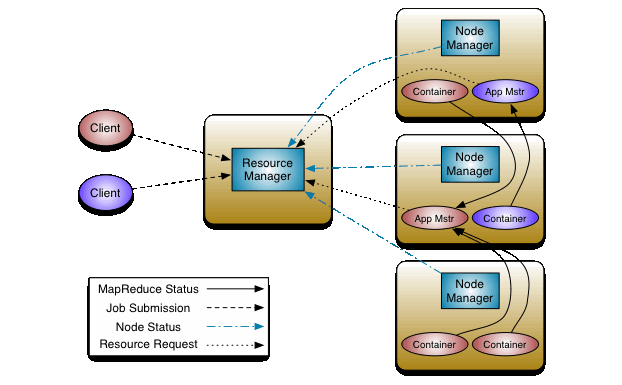
YARN
Yet Another Resource Negotiator
YARN Architecture
Launching an application
yarn jar application.jar DriverClass input outputList running jobs
yarn application -listyarn topSee application logs
yarn logs -applicationId applicationIdKill an application
yarn application -kill applicationIdFair Scheduler
- Resources will be shared with the rest of users using the YARN fair share scheduler
- Dominant Resource Fairness: both CPU and memory considered
- Jobs should be composed of lots of short running tasks so they share resources nicely with other jobs
- Long running tasks that monopolize resources during large times can be preempted to allow other applications to run
Fair Scheduler Queues
- root.users.[username]: default queue, one per user
- interactive: Jupyter Notebooks and interactive jobs
- urgent: limited resources that can be used for urgent jobs
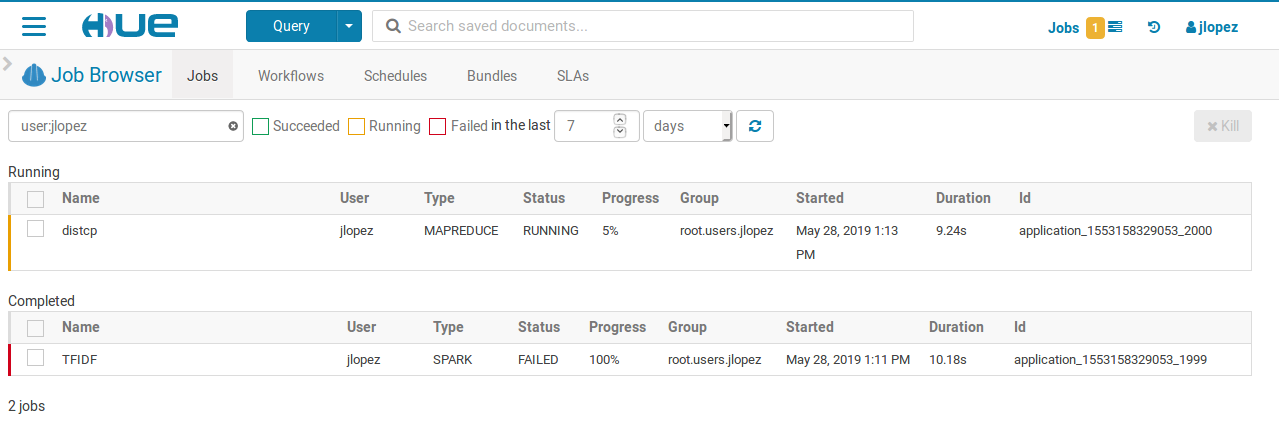
Web Job Browser
You can access the HUE Job Browser from the WebUI:
Provided Tools
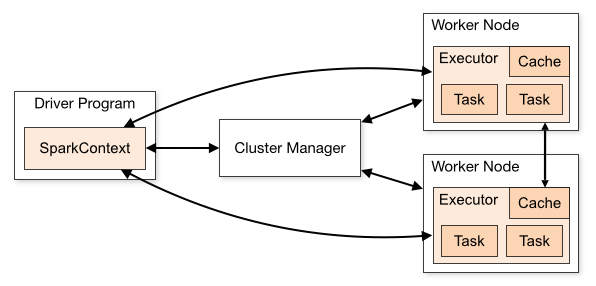
Spark
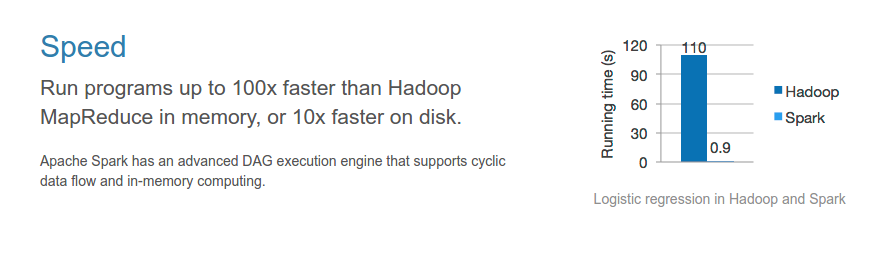
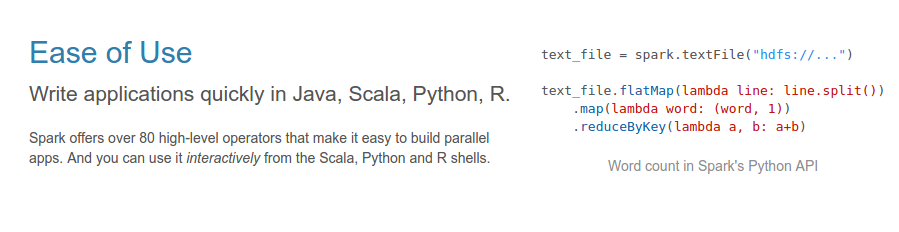
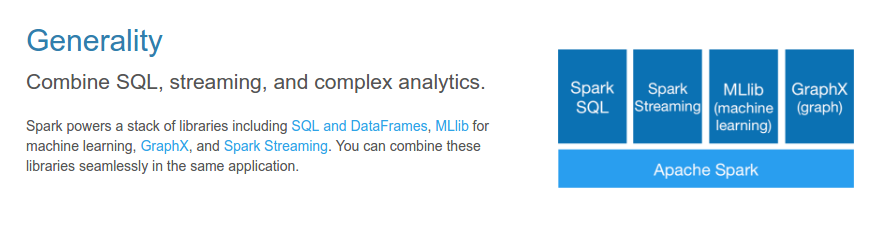
A fast and general engine for large-scale data processing
Speed
Easy
Generality
Language Selection
- Scala
- Java
- Python
- R
Updated to Spark 2.4
Now the main entry point is spark instead of sc and sqlContext
Spark Python
PySpark
PySpark Basics
- Can be used together with Anaconda Python distribution
- Over 720 packages for data preparation, data analysis, data visualization, machine learning and interactive data science
Running pyspark interactively
- Running from the command line:
pyspark - Running from the command line using ipython:
module load anaconda2 PYSPARK_DRIVER_PYTHON=ipython pyspark - Running inside a Jupyter notebook
Example
          from pyspark.sql import Row
          Person = Row('name', 'surname')
          data = []
          data.append(Person('Joe', 'MacMillan'))
          data.append(Person('Gordon', 'Clark'))
          data.append(Person('Cameron', 'Howe'))
          df = spark.createDataFrame(data)
          df.show()
           +-------+---------+
           |   name|  surname|
           +-------+---------+
           |    Joe|MacMillan|
           | Gordon|    Clark|
           |Cameron|     Howe|
           +-------+---------+
spark-submit
Submit job to queue
Spark Components
spark-submit Python
        # client mode
        spark-submit --master yarn \
          --name testWC test.py input output
        # cluster mode
        spark-submit --master yarn --deploy-mode cluster \
          --name testWC test.py input output
spark-submit Scala/Java
        # client mode
        spark-submit --master yarn --name testWC \
          --class es.cesga.hadoop.Test test.jar \
          input output
        # cluster mode
        spark-submit --master yarn --deploy-mode cluster \
          --name testWC \
          --class es.cesga.hadoop.Test test.jar \
          input output
spark-submit options
--num-executors NUM    Number of executors to launch (Default: 2)
--executor-cores NUM   Number of cores per executor. (Default: 1)
--driver-cores NUM     Number of cores for driver (cluster mode)
--executor-memory MEM  Memory per executor (Default: 1G)
--queue QUEUE_NAME     The YARN queue to submit to (Default: "default")
--proxy-user NAME      User to impersonate
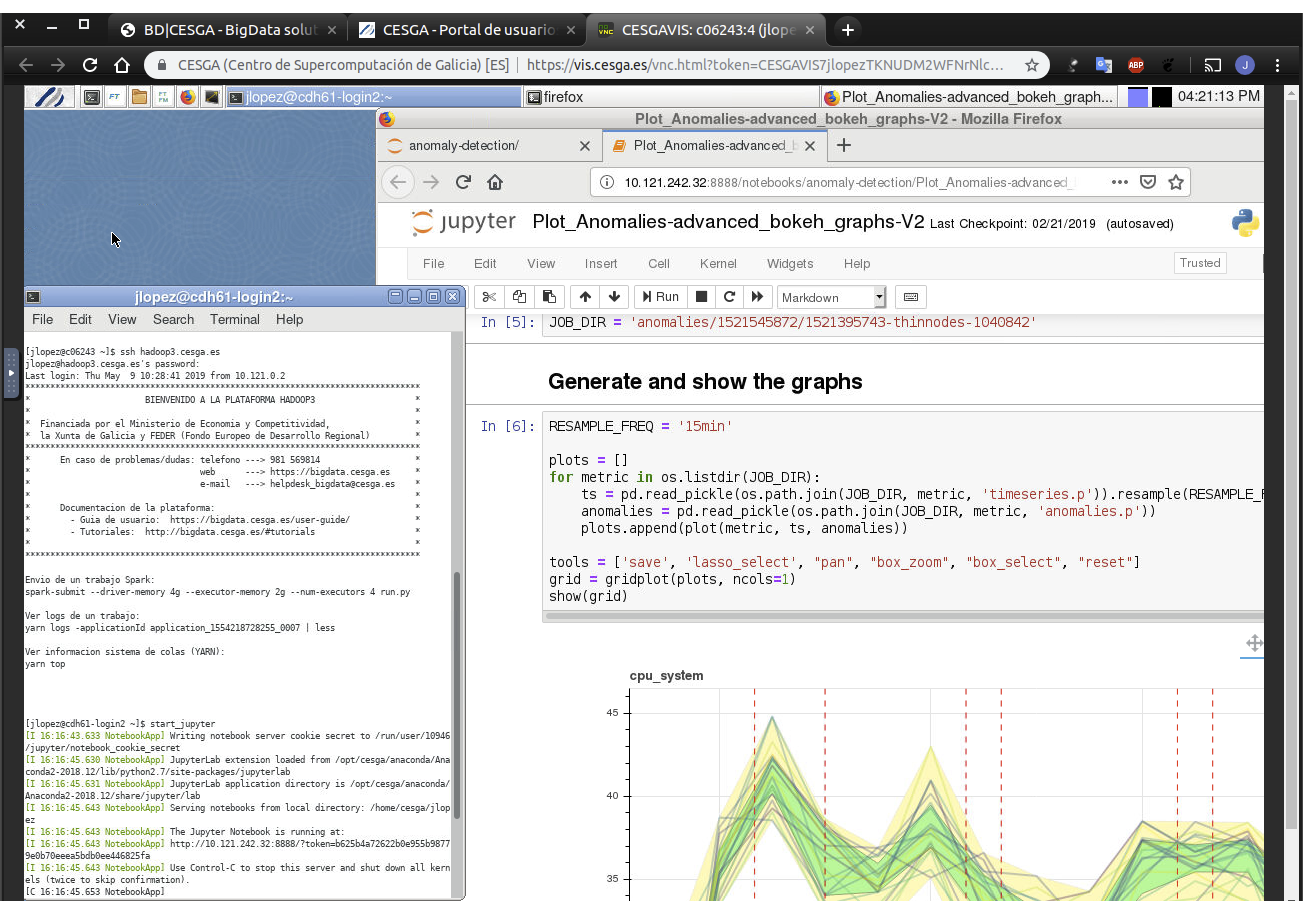
Jupyter
Interactive Computing
Jupyter
The Jupyter Notebook is a web application that allows you to create and share documents that contain live code, equations, visualizations and explanatory text.
Launching Jupyter
- Connect to hadoop3.cesga.es
- Go to your working directory
- Launch the Jupyter server
start_jupyter - Point your browser to the provided URL
- VPN must be running if not using a remote desktop
Jupyter
Using Python 3
You can also use Jupyter with Python 3:
          module load anaconda3/2018.12
          start_jupyter
Just load the desired python version first
Keep in mind that CDH 6.1 does not officially support Python 3 yet
JupyterLab
You can also try the new Jupyter Lab:
          module load anaconda2/2018.12
          start_jupyter-lab
JupyterLab
JupyterLab
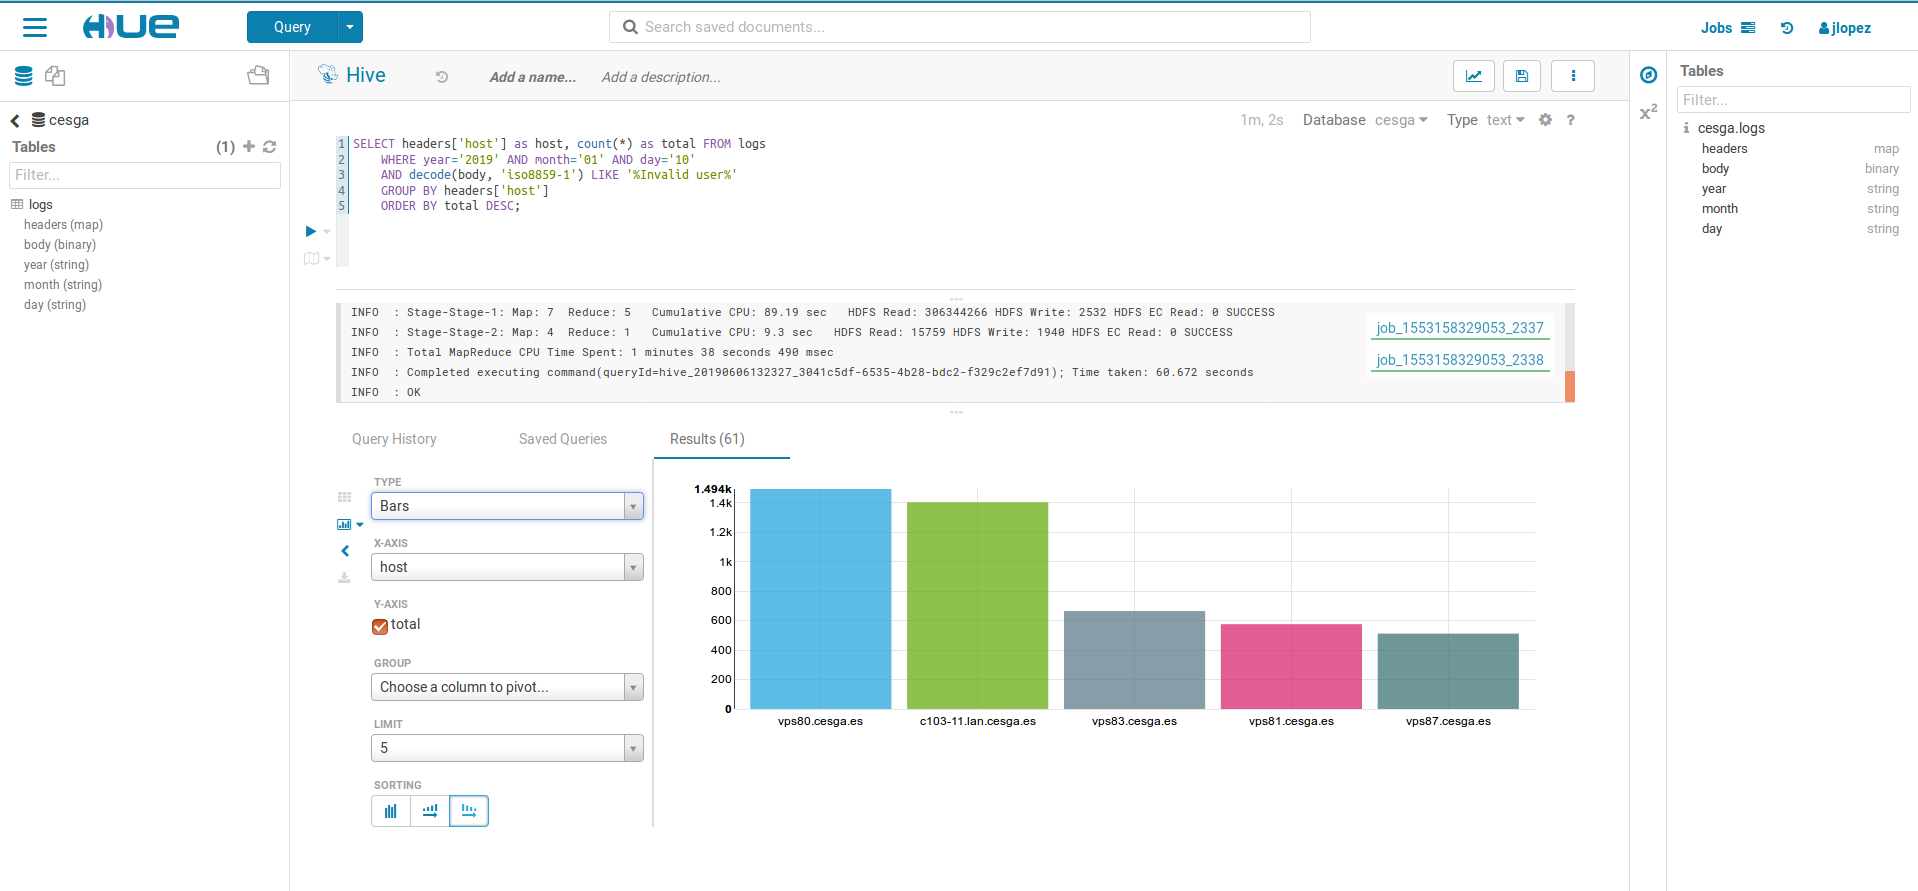
Hive
SQL-like interface
Hive
Hive offers the possibility to use Hadoop through a SQL-like interface
Using Hive: HUE
You can use Hive from the WebUI through HUE:
Using Hive: Beeline
beelinebeeline> !connect
jdbc:hive2://c14-19.bd.cluster.cesga.es:10000/default;
ssl=true;sslTrustStore=/opt/cesga/cdh61/hiveserver2.jks;
trustStorePassword=notsecretUsing Hive: deprecated
The Hive CLI is not deprecated and not recommended:
hiveField delimitter
- Default field delimitter Ctr+A (0x01)
- It can be changed when creating a table
            ROW FORMAT DELIMITED
            FIELDS TERMINATED BY ':'
Important Considerations
- Do not create tables in the default database
- Create a database with your username and then create your tables in this database
          create database if not exists uscfajlc;
          use uscfajlc;
Important Considerations
- To restrict access to your database set permissions of the directory:
hdfs dfs -chmod go-rwx /user/hive/warehouse/uscfajlc.dbImpala
Low-latency SQL queries
Impala
impala-shell --ssl --impalad=c14-2Point it to any worker node in the cluster
Impala
Hive and Impala use the same SQL syntax HiveQL
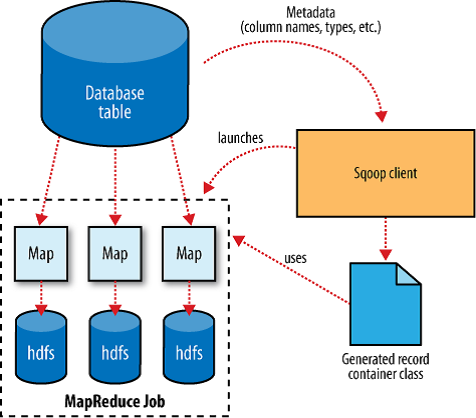
Sqoop
Transferring data between Hadoop and relational databases
Sqoop
List tables
        sqoop list-tables \
          --username ${USER} -P \
          --connect jdbc:postgresql://${SERVER}/${DB}
Import one table
        sqoop import \
          --username ${USER} --password ${PASSWORD} \
          --connect jdbc:postgresql://${SERVER}/${DB} \
          --table mytable \
          --target-dir /user/username/mytable \
          --num-mappers 1
Import into Hive
        sqoop import \
          --username ${USER} --password ${PASSWORD} \
          --connect jdbc:postgresql://${SERVER}/${DB} \
          --table mytable \
          --target-dir /user/username/mytable \
          --num-mappers 1 \
          --hive-import
Create only the table structure into Hive
        sqoop create-hive-table \
          --username ${USER} --password ${PASSWORD} \
          --connect jdbc:postgresql://${SERVER}/${DB} \
          --table mytable
Sqoop Export
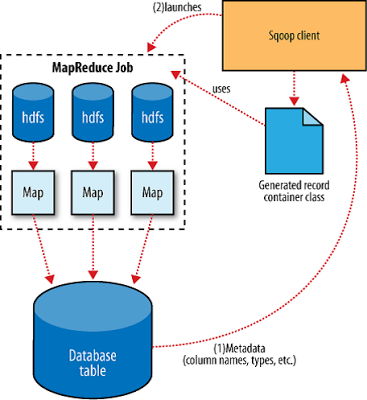
Export
First create table into PostgreSQL
        sqoop export \
          --username ${USER} --password ${PASSWORD} \
          --connect jdbc:postgresql://${SERVER}/${DB} \
          --table mytable \
          --export-dir /user/username/mytable \
          --input-fields-terminated-by '\001' \
          --num-mappers 1
Direct mode
For MySQL and PosgreSQL for faster performance you can use direct mode (--direct option)
Sparklyr
R interface for Apache Spark
- Connect to Spark from R.
- Complete dplyr backend.
- Filter and aggregate Spark datasets then bring them into R for analysis and visualization.
- Use Spark’s distributed machine learning library from R.
- Work with data stored on HDFS
Getting started
Connecting R to a spark session
- Load the package
> library(sparklyr) - Define a spark connection
> sc <- spark_connect(master = "yarn-client", spark_home = Sys.getenv('SPARK_HOME')) - Use the
scconnection to use spark from R - Close the connection:
> spark_disconnect(sc)
More options
- Use Jupyter Notebooks
start_jupyter - Launch R scripts
spark-submit --class sparklyr.Shell '/opt/cesga/anaconda/Anaconda2-2018.12-sparklyr/lib/R/library/sparklyr/java/sparklyr-2.4-2.11.jar' 8880 1234 --batch example_sparklyr_script.R
Remember to disconnect sessions and properly shut down Jupyter Notebook servers.
More info
GATK
Genome Analysis Toolkit
How to use
gatk is available as a module on hadoop3.cesga.es
module load gatkMore info on how to use modules on the modules tutorial
Using SPARK tools
gatk uses hdfs when you launch a SPARK tool, check the hdfs tutorial for instructions.
gatk only supports SPARK on some tools, SPARK tools always end with Spark. Check the tool list here.
gatk ToolName toolArguments -- --spark-runner SPARK --spark-master yarn additionalSparkArguments additionalSparkArguments can be used if a gatk job needs access to more resources, SPARK tutorial
Examples
gatk HaplotypeCallerSpark -L 1:1000000-2000000 -R hdfs://nameservice1/user/username/ref.fa -I hdfs://nameservice1/user/username/input.bam -O hdfs://nameservice1/user/username/output.vcf -- --spark-runner SPARK --spark-master yarn --driver-memory 4g --executor-memory 4ggatk CalcMetadataSpark -I hdfs://nameservice1/user/username/input.bam -O hdfs://nameservice1/user/username/statistics.txt -- --spark-runner SPARK --spark-master yarnNon SPARK tools
You can use standard gatk tools on hadoop3.cesga.es for testing but its not recommended
For this use case, gatk is also available on the finisterrae for faster execution.
More documentation
PaaS
When you need something outside the Hadoop ecosystem.
- Deploy custom Big Data clusters.
- Try out a variety of products
- Built on docker
- Easy to use
Warning
The PaaS service is intended to test, learn and develop using the products offered, not for continuous use.
Clusters must be destroyed when not needed anymore.
Clusters are designed for flexibility, if you need to use any of the products permanently, on a production environment, contact us for a custom solution.
How to use
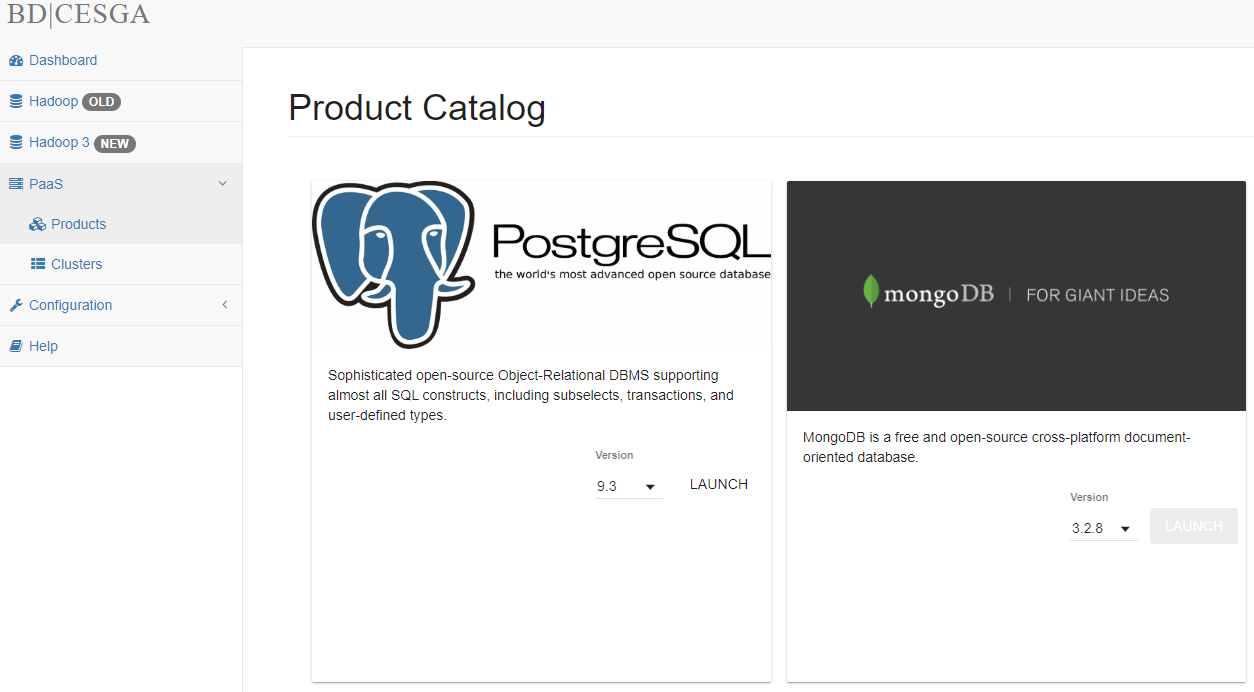
Access the WebUI and log in.
In the menu o the left click on PaaS and then on Products to se the available products
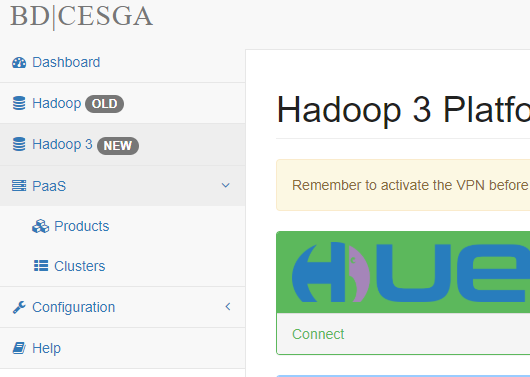
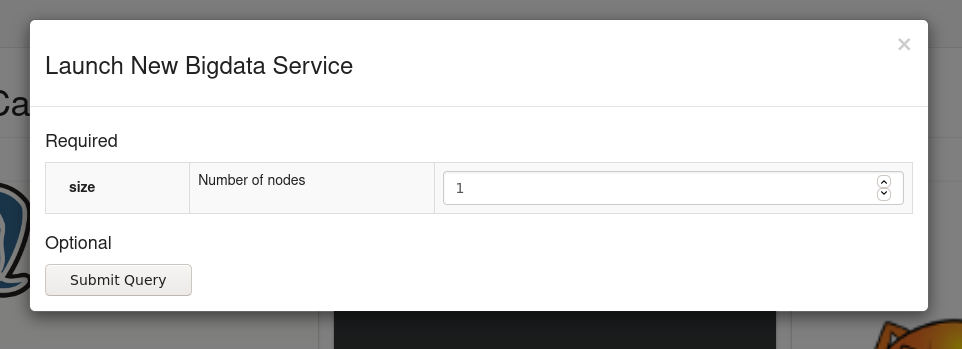
Select a product and click on LAUNCH
Specify the resources that you need
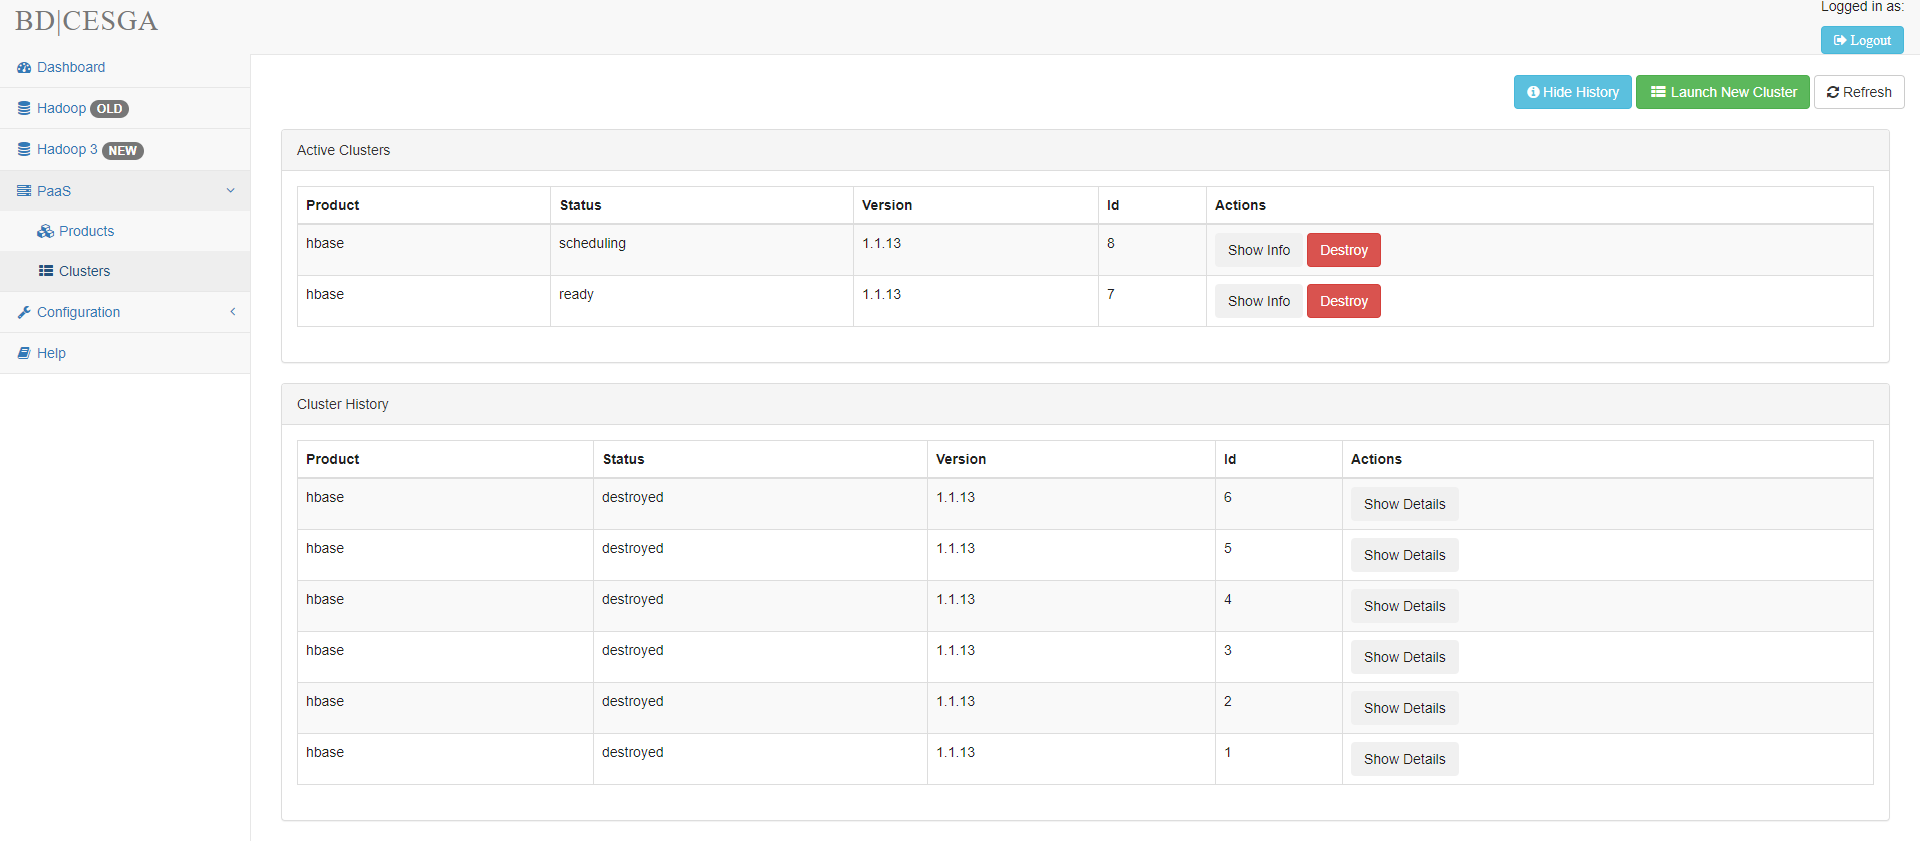
The Clusters page
Here you can get information on the clusters you launched
Destroy the clusters when they are no longer needed
HBASE
The Hadoop Database
Warnings
All PaaS products should only be used for testing and developing purposes.
Destroy the clusters when you no longer need them, do not saturate the service.
Creating an Hbase instance
Launch an HBASE Cluster through the webUI and get the Network Address
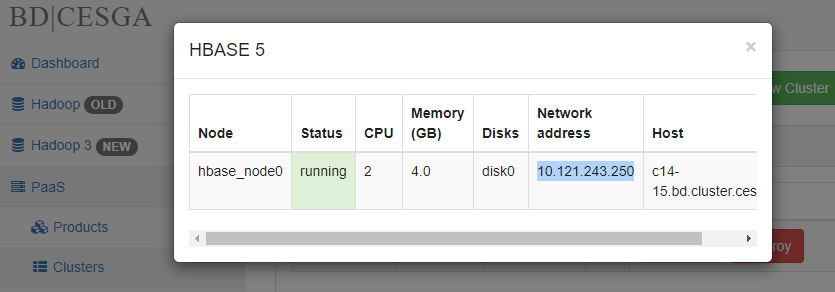
Add the Network Address to your /etc/hosts
10.121.243.250 hbase_node0
Activate the vpn and test the connection
ping hbase_node0
How to use
Using Python
You can use happybase. There is a 'test' table you can use to verify everything works:
      import happybase
      connection = happybase.Connection(host='10.121.243.250')
      test = connection.table('test')
      for k, d in test.scan(): print k, d
Using Java
To connect using java you can use our Sample Java HBaseclient and modify the hbase.zookeeper.quorum to reflect the right IP of your instance
The example App can be built using maven
                  mvn package
                  java -jar target/hbaseclient-0.1.0.jar
MongoDB
Warnings
All PaaS products should only be used for testing and developing purposes.
Destroy the clusters when you no longer need them, do not saturate the service.
How to launch
Activate your VPN and connect to the webUI.
Go to PaaS > Products and launch a MongoDB cluster.
Select the resources you need.
For testing the product use only 1 CPU to save up on resources
Connect to the cluster
When cluster status is ready click on show info and copy the IPs provided.
- You can use the IP beginning with 10.112.XXX.XXX to connect from your computer providing your VPN is active.
- You can also conect to 10.117.XXX.XXX (faster connection) but only from a machine at CESGA, like hadoop3.cesga.es
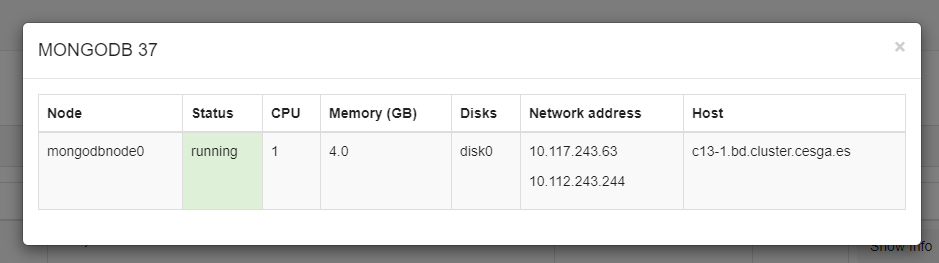
Examples
Form your computer:
mongo --host 10.112.243.28Form hadoop3.cesga.es or ft.cesga.es:
mongo --host 10.117.243.28Cassandra
Warnings
All PaaS products should only be used for testing and developing purposes.
Destroy the clusters when you no longer need them, do not saturate the service.
How to launch
Activate your VPN and connect to the webUI.
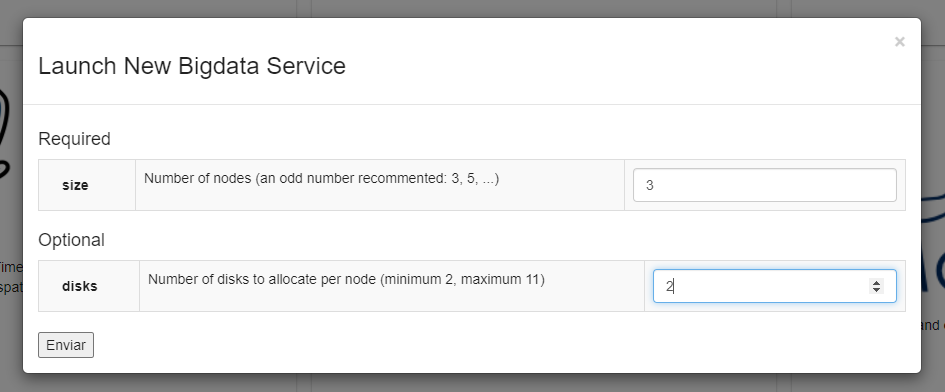
Go to PaaS > Products and launch a Cassandra cluster.
Select the resources you need. Minimun 3 nodes (an odd number is recommented) and 2 disks per node (Max 11 disks)
For testing the product use the minimun resources possible
Connect to the cluster
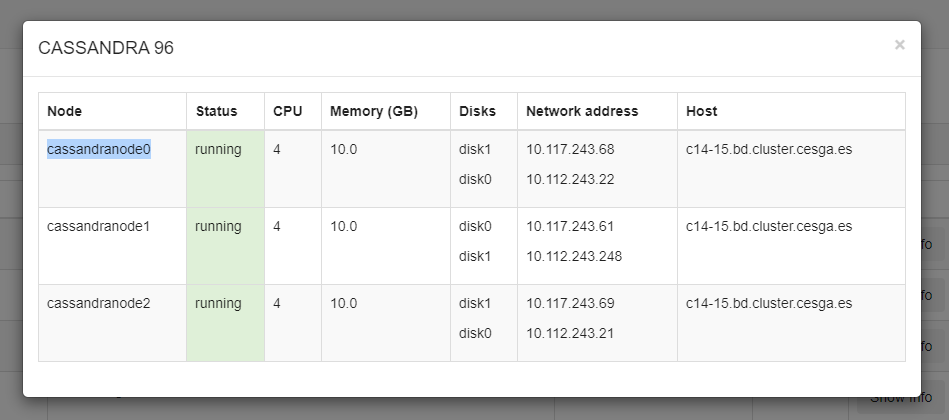
When cluster status is ready click on show info and copy the IPs provided for the "cassandranode0"
- You can use the IP beginning with 10.112.XXX.XXX to connect from your computer providing your VPN is active.
- You can also conect to 10.117.XXX.XXX (faster connection) but only from a machine at CESGA, like hadoop3.cesga.es
You can access through cqlsh or use any other application, like python
Examples
Form your computer:
cqlsh 10.112.243.28Form hadoop3.cesga.es or ft.cesga.es:
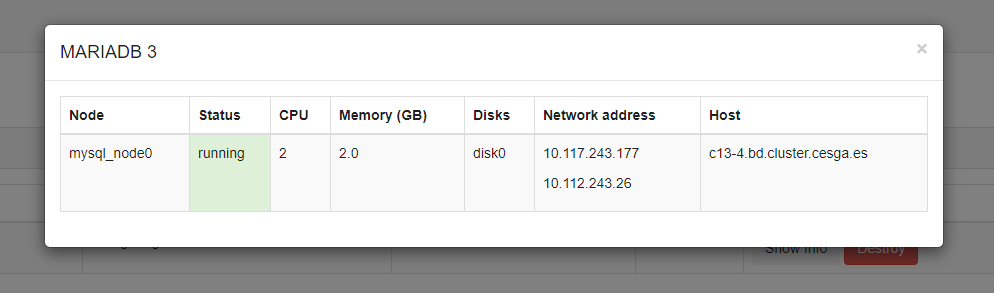
cqlsh 10.117.243.28MariaDB
Warnings
All PaaS products should only be used for testing and developing purposes.
Destroy the clusters when you no longer need them, do not saturate the service.
How to launch
Activate your VPN and connect to the webUI.
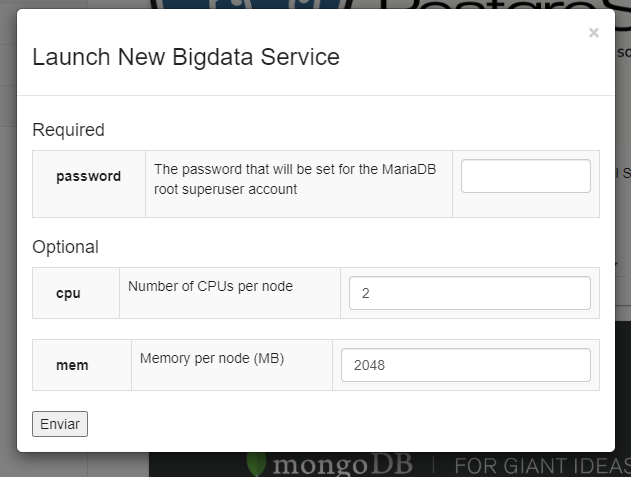
Go to PaaS > Products and launch a MariaDB cluster.
Select the resources you need and provide a numeric password.
For testing the product use only 1 CPU to save up on resources
Connect to the cluster
When cluster status is ready click on show info and copy the IPs provided.
- You can use the IP beginning with 10.112.XXX.XXX to connect from your computer providing your VPN is active.
- You can also conect to 10.117.XXX.XXX (faster connection) but only from a machine at CESGA, like hadoop3.cesga.es
Examples
Form your computer:
mysql -u root -p -h 10.112.243.28Form hadoop3.cesga.es or ft.cesga.es:
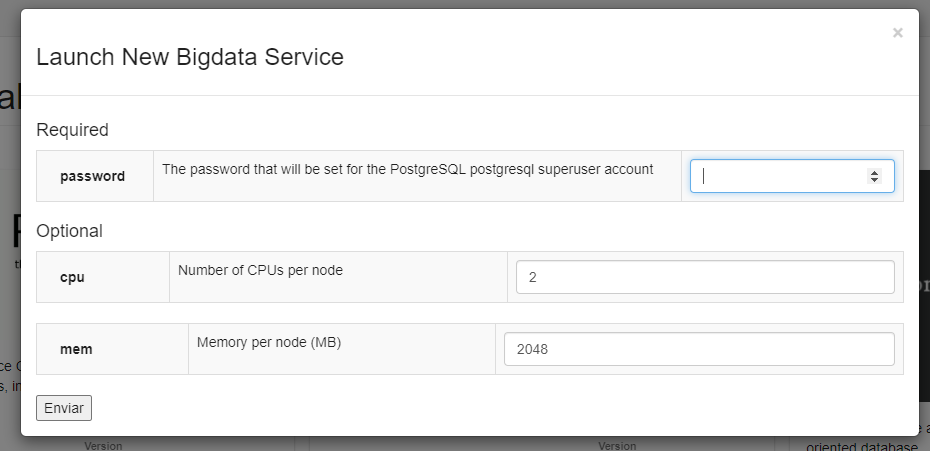
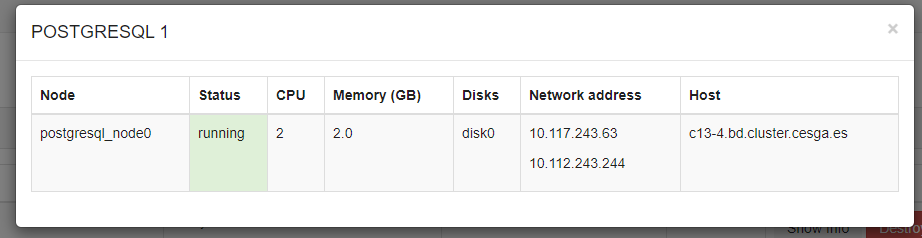
mysql -u root -p -h 10.117.243.28PostgreSQL
Warnings
All PaaS products should only be used for testing and developing purposes.
Destroy the clusters when you no longer need them, do not saturate the service.
How to launch
Activate your VPN and connect to the webUI.
Go to PaaS > Products and launch a PostgreSQL cluster, selecting your preferred version.
Select the resources you need and provide a numeric password.
For testing the product use only 1 CPU to save up on resources
Connect to the cluster
When cluster status is ready click on show info and copy the IPs provided.
- You can use the IP beginning with 10.112.XXX.XXX to connect from your computer providing your VPN is active.
- You can also conect to 10.117.XXX.XXX (faster connection) but only from a machine at CESGA, like hadoop3.cesga.es
You need to connect as user postgresql and to the database test
You will then be asked for your numeric password
After initial connection you can create other databases using create database <databasename>
Examples using psql
Form your computer:
psql -h 10.112.243.248 -U postgresql testForm hadoop3.cesga.es or ft.cesga.es:
psql -h 10.117.243.248 -U postgresql test Using the postgresql spatiotemporal product
This product includes 2 of the most popular extensions for managing time series and spatial data
After launching the product, the process of setting up and conecting is the same
In order to use the extensions, load them first in your db
CREATE EXTENSION IF NOT EXISTS postgis CASCADE;CREATE EXTENSION IF NOT EXISTS timescaledb VERSION '1.7.5' CASCADE;Modules
Additional Software Versions
Choosing software versions
module availableAnaconda
We recommend that you use the Anaconda version of Python instead of the OS one
module load anaconda2/2018.12Even you can try Python 3 (not officially supported)
module load anaconda3/2018.12Build tools
You can load the following build tools
- maven
- sbt
Technology Selection
Where to get additional information
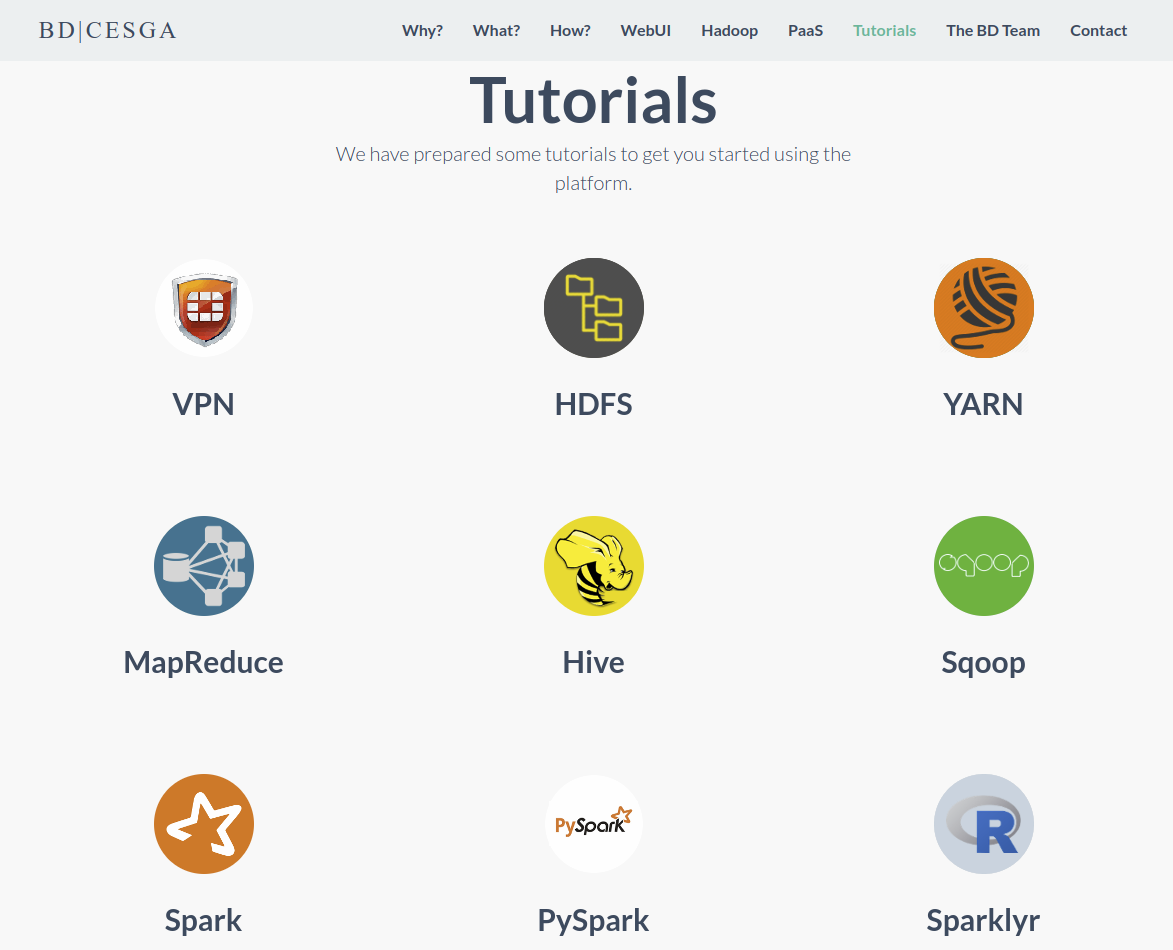
Tutorials
User Guide
DTN User Guide

Official Documentation
Cloudera Official Documentation:
Reference Documentation for each component:
Upcoming courses
- Spark Course: covering pyspark and sparklyr
- Additional courses (Hive, HBase, Kafka, Flume, Sqoop): depending on your interests
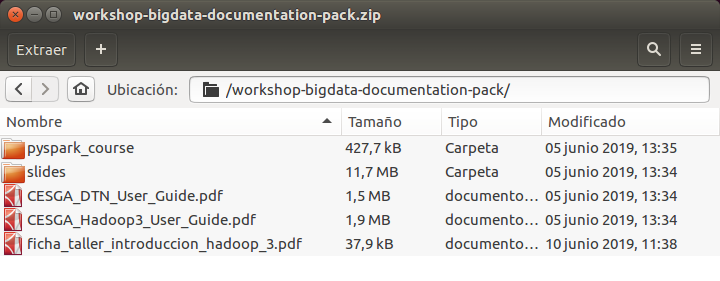
Documentation Pack
We have prepared a documentation pack including today's slides as well as all related material:
Q&A
Big Data is a multi-disciplinary domain.
Collaboration is a key factor in Big Data projects.
Tell us your project and we will help you:
Extra Material
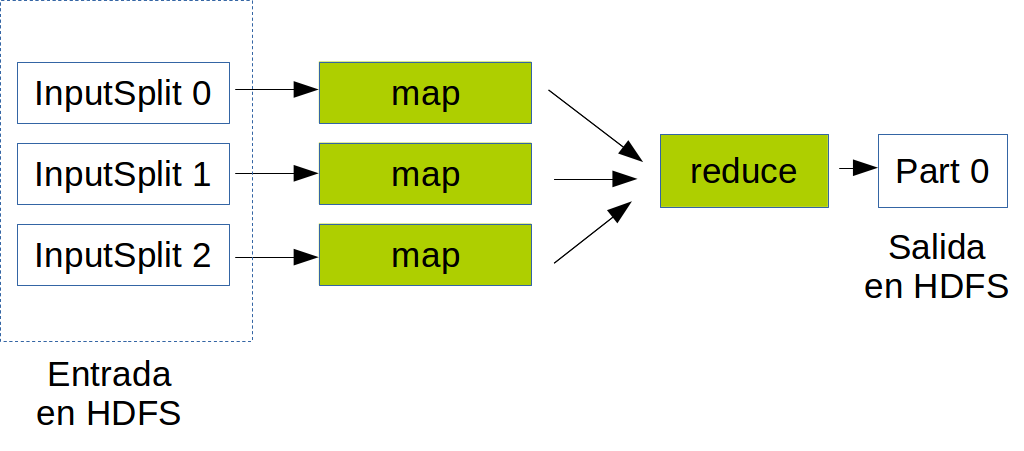
MapReduce
MapReduce
MapReduce is a programming model and an associated implementation for processing and generating large data sets with a parallel, distributed algorithm on a cluster.
MapReduce
Launching a job
To launch a job:
yarn jar job.jar DriverClass input outputList MR jobs
To list running MR jobs:
mapred job -listCancelling a job
To cancel a job:
mapred job -kill [jobid]Monitoring
You can easily monitor your jobs using the YARN UI from the WebUI:

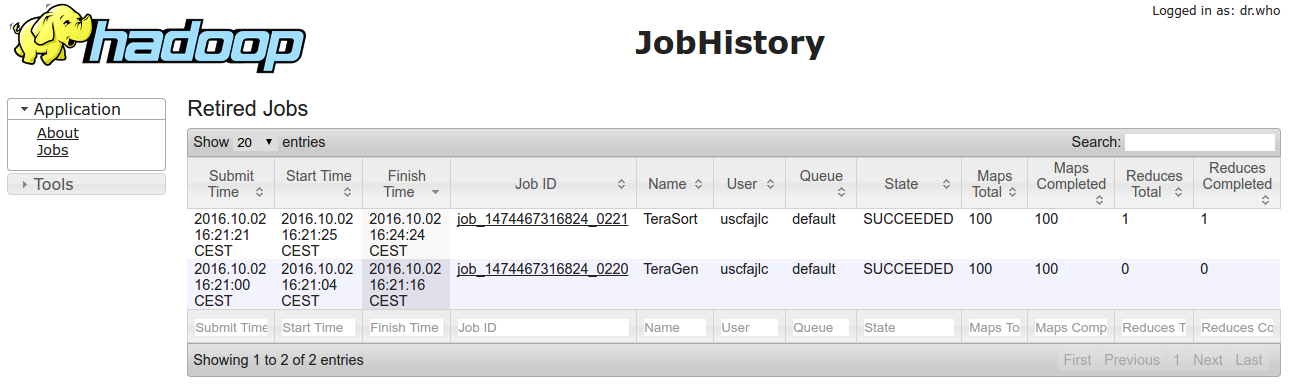
Job History
You can see finished jobs using the MR2 UI from the WebUI:
MapReduce for Java developers
Development Environment Setup
- For a sample Maven-based project use:
git clone https://github.com/bigdatacesga/mr-wordcount - Import the project in Eclipse using m2e or in Intellij
- If using an IDE like Eclipse or Intellij it can be useful to:
              # Download sources and javadoc
              mvn dependency:sources
              mvn dependency:resolve -Dclassifier=javadoc
              # Update the existing Eclipse project
              mvn eclipse:eclipse
              # Or if you using Intellij IDEA
              mvn idea:idea
Maven Basic Usage
Compile:
mvn compileRun the tests
mvn testPackage your app
mvn packageManual Process
If you prefer to compile and package manually:
            javac -classpath $(hadoop classpath) *.java
            jar cvf wordcount.jar *.class
MapReduce Program
Basic components of a program:
- Driver: management code for the job or sequence of jobs
- map function of the Mapper
- reduce function of the Reducer
Driver Code
public class Driver {
  public static void main(String[] args) throws Exception {
    Configuration conf = new Configuration();
    Job job = Job.getInstance(conf);
    job.setJarByClass(Driver.class);
    job.setJobName("Word Count");
    job.setMapperClass(WordMapper.class);
    job.setCombinerClass(SumReducer.class);
    job.setReducerClass(SumReducer.class);
    job.setOutputKeyClass(Text.class);
    job.setOutputValueClass(IntWritable.class);
    FileInputFormat.setInputPaths(job, new Path(args[0]));
    FileOutputFormat.setOutputPath(job, new Path(args[1]));
    boolean success = job.waitForCompletion(true);
    System.exit(success ? 0 : 1);
  }
}
Map Code
public class WordMapper
    extends Mapper<LongWritable, Text, Text, IntWritable> {
	private final static IntWritable one = new IntWritable(1);
	private Text word = new Text();
	@Override
	public void map(LongWritable key, Text value, Context context)
			throws IOException, InterruptedException {
		String line = value.toString();
		for (String field : line.split("\\W+")) {
			if (field.length() > 0) {
				word.set(field);
				context.write(word, one);
			}
		}
	}
}
Reduce Code
public class SumReducer
  extends Reducer<Text, IntWritable, Text, IntWritable> {
	@Override
	public void reduce(
            Text key, Iterable<IntWritable> values, Context context)
			throws IOException, InterruptedException {
		int wordCount = 0;

		for (IntWritable value : values) {
			wordCount += value.get();
		}
		context.write(key, new IntWritable(wordCount));
	}
}
MapReduce Streaming API
Quick how-to
- We write two separated scripts: Mapper y Reducer
- The Mapper script will receive as stdin the file line by line
- The stdout of the Mapper and Reducer must be key-value pairs separated by a tab
Example
yarn jar \
    /usr/hdp/current/hadoop-mapreduce-client/hadoop-streaming.jar \
    -input input -output output \
    -mapper mapper.pl -reducer reducer.pl \
    -file mapper.pl -file reducer.pl
Optimizations
Improving the performance
BLAS
Low-level routines for performing common linear algebra operations
- Intel MKL: /opt/cesga/anaconda/Anaconda2-2018.12/lib/libmkl_rt.so
Single Dynamic Library (SDL) interface - OpenBlas: /usr/lib64/libopenblas.so.0
NumPy
Adds support to Python for fast operations with multi-dimensional arrays and matrices
Already configured to use Intel MKL
Storage Formats


Success Stories
Gaia (UDC)

FilmYou (CITIC)